I have written this addendum to the SBIG procedure for baking out the desiccant
in the SBIG ST10XME. I suggest using the SBIG procedure as called out in the manual with augmentation as called out below.
This procedure adds two main features to the SBIG procedure. The first is a way of reducing moisture absorption by the desiccant
plug while waiting for it to cool enough to replace in the camera. The second is a physical holding technique to prevent losing
the rubber “o” ring inside the camera cavity.
1. Remove the existing desiccant plug. I suggest loosening the screw with a
screwdriver and then holding the camera with nose pointed straight up to finish unscrewing and removing the desiccant plug.
There is a small O-ring around the end of the plug and it should come out with the plug if holding it positioned as called
out above. If you have the camera held with the plug facing up to remove, there is the possibility of the O-ring falling off
of the plug and getting trapped down in the camera cavity.
2. Immediately replace the plug with the dummy plug provided by SBIG. Be sure
to put an O-ring on this dummy plug when doing this step. (SBIG provided a spare with my dummy plug). This prevents more moisture
from entering the camera while you bake the desiccant. It is best to perform steps 1 & 2 in a room where humidity is as
low as possible (if below 40 percent then be careful of ESD (static discharge).
3. Bake desiccant for 4 hours in standard or convection oven at 350 degrees
F as called for in SBIG manual. Be careful to preheat oven to even temperature prior to putting the desiccant in the oven.
Place the plug in some oven rated sealed dish or pan.
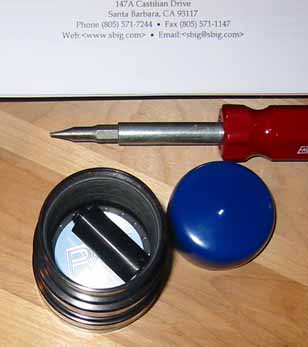
4. Assemble a low humidity cooling chamber (see Photo
1: Chamber Parts). I constructed a cooling chamber for the desiccant. It is made of a 2” extension tube (in my
case I had an AP extension, but any will do), a PWT desiccant plug or similar (I used a freshly charged desiccant packet in
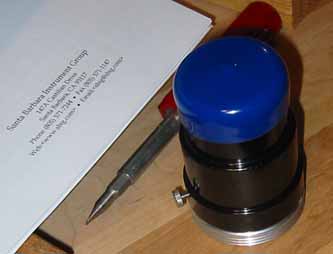
my PWT plug that goes in the focuser of my AP scope), and a plastic or metal cap to seal the other end of the homemade chamber. (see Photo 2: Plug Inside Chamber). Place the PWT plug in one end of the extension tube and place
the plastic plug on the other end. (See Photo 3: Sealed Chamber) The 4 hour bake period should
allow the air in the chamber to be relatively dehumidified.
5. After 4 hours, remove the desiccant plug from the oven. Be careful as it is
very hot and will perform a nice exfoliation of your skin if you touch it. I used metal cooking tongs to pick up the plug,
but any metal gripping tool will work.
6. Remove the plastic end off the top of the extension tube (chamber). Drop
the desiccant plug in the constructed low humidity chamber. (See Photo 2: Plug Inside Chamber).
Replace the plastic plug on top of the chamber (remember that a metal top is even better if you have one that will fit or
screw down on the top of the extension tube). (See
Photo 3: Sealed Chamber)
7. Wait for the desiccant plug to cool. The chamber serves 2 purposes here.
First it provides a low humidity environment to store the plug while waiting for replacement in the camera. Second it facilitates
the cooling of the plug via the massive metal surface and contact with the plug. I waited 30 minutes and the plug was room
temperature. Your mileage may vary.
8. Remove the dummy plug from the camera using the same technique as described
above for removed the desiccant plug. Again be careful to retrieve the O-ring.
8. Open the chamber.
9. Remove the plug.
10. Replace the O-ring on the plug and hold the plug with the O-ring end up.
11. Hold the camera with the nose pointed up and the plug cavity pointed down
and level.
12. Position the plug with the O-ring in place on the plug with the plug assembly
held directly below the camera.
13. Insert and screw the plug back into the camera as it was originally. Be
careful to seat the O-ring properly. This is a blind operation, so that is why I specified holding the camera in the designated
position and holding it level.
14. I suggest letting the camera sit overnight. I believe that it can be turned
on immediately if required. In that case it may frost. Do not turn the cooler up to max, but allow the frost to dissipate.
At this point, the moisture in the camera cavity should have been absorbed by the desiccant in the plug. This could take as
long as several hours. If you let the camera sit overnight, then there will probably be no moisture during the next use.
The low humidity chamber may be constructed of any materials that can control
the environment around the plug and absorb moisture of the air inside the chamber. Any sealable box or tube will work. I used
things that most of us have already. If you don’t have a PWT plug, then any fresh desiccant will work. Just be careful
to use materials that the hot plug will not melt and if you use desiccant bags, be sure that they don’t contact the
hot plug, as it will melt them and cause a chemical spill.
I hope this procedure helps. Happy photon gathering!
Rick